 Part 1: Downloading “free-to-use” RIYAL astrological software Edited 3-06-2013)
Chart Calculation software is now available for Natal, Solar Return & Progressed Daily Angles charting within the MC-Solar Cycle methodology. Dave Monroe, June 9, 2011
Riyal for Windows is an astrology-astronomy calculation software program developed by Juan Revilla of Costa Rica. Juan ia a highly respected authority of positional calculation of astronomical bodies and fully capable astrologer. Juan researches Centaurs and other solar system bodies. RIYAL has been undergoing extensive upgrades in early 2013, any revision numbers referred to and illustrated screens may change in small ways from what this text portrays. The Riyal software can be freely downloaded although donations are accepted. Riyal is a “DOS-like” program with simple-to-use entry boxes and logical choices for obtaining the information and charts that you wish to have. Riyal runs under Windows programs. Edited to add Feb. 2020: Riyal does not run under Windows 10 unless you set it to run under a prior version, Windows 8. If you do this, and make sure the included symbol font is installed (click “install” for the font file). The following steps will aid you in downloading this software and setting up the software to provide charts such as those used in this blog-site.
Setting up RIYAL software for using the MC-Solar Cycle methods. The following steps are required to produce this charting format.
ONE: Using your Internet browser, go to http://www.expreso.co.cr/centaurs/riyal.html This is the site for acquiring RIYAL FOR WINDOWS version 3.9.4. There are several choices offered which include 1) What’s New, 2) RIYAL FOR WINDOWS, 3) Excluded file . . ., 4) Read the documentation, 5) Download individual files, 6) Riyal for DOS, 7) Sample screens and 8) New graphic samples.
TWO: On the opening screen splashpage, click on the choice RIYAL FOR WINDOWS. Save this download, then run the download. Your shortcut on the desktop will be an inverted gray V on a yellow circle with a black R in the “V”. This download will provide all of the programs with RIYAL that you will need. If the downloaded files did not indicate that they were being “extracted” (expanded and installed) click on this yellow icon and that will be done, enabling you to go to the RIYAL folder on your C drive, create a shortcut icon for your desktop, and then use the program. (This step two has been updated, March 6, 2013).
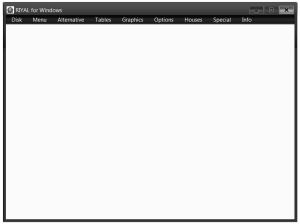
THREE: On the opening screen splash page, clicking on the illustration will expand the RIYAL screen to your full monitor height. If you leave the display at this size, all screens will expand width-wise to suit the charts being shown or the other displays size requirements. If, instead, you go to the click on the “Disk” menu choice and select the on/off flag “Extend screen”, the black presentation page of RIYAL will shrink to an 800 X 600 display. I have found this best to work with when printing charts. After you have been using RIYAL, a Personal database is automatically created similar to the “Sample database. You can access this Personal database to download individual files. (TUpdated,, 3-06-2011).
FOUR: At some point it is suggested that you return to the RIYAL download web-site page and download the “Read the documentation.” I would recommend printing out the three-dozen plus pages for reference. At least read them.
Note: Before using Riyal to create charts you must configure the application so that it provides the data in the form you want it — please read the section on Configuration. The process typically used for calculating charts will include !) creating and saving a natal chart, 2) creating a solar return, and 3) creating a Progressed Daily Angles chart. Riyal does not provide location lookup tables for cities and towns, so you will need to know the longitude and latitude for any chart’s location.
FIVE: CONFIGURING RIYAL BEFORE CREATING CHARTS. Threre are three screens that you need to use for configuring Riyal prior to your first use of the program. These choices are under the Options menu. (This step two has been updated, Dec. 1, 2011 to show actual screen copies.)
 The main RIYAL screen will appear after clicking on the “shortcut” icon, and after clicking on the splash screen and then the “Disk” selection at the top-left of the menu-bar to choose “extend screen”. This toggles off-on the size of the screeen you use–you will want to use a rectangular 800 x 600 screen in order to keep circular charts from being distorted.
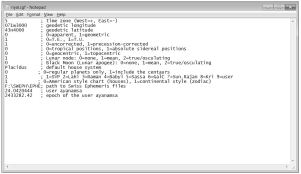
 FIVE “A”: Go to the Options Menu and click on the “edit riyal.cfg” selection. The screen shown at the right will appear. Change the left-hand side selections as follows: (“x” indicates that you should enter your own appropriate choice)
“x” for your time zone in hours, e/w.
“x” for your geodetic longitude (default for your location and your chart). These settings can be overriden at any data entry step for other charts.
“x” for your geodetic latitude (default for your location and your chart).
“x” for your choice of apparent or geometric positioning (geometric preferred)
“1” for Universal Time listed on the charts produced (Greenwich Meridian Time).
“1” for precession corrected tropical positions (or Sidereal zodiac, if you wish. The typical non-precession corrected Tropical zodiac is not reccommended).
“0” for tropical positions
“0” for geocentric positions
“x” for your choice of node position to use
“x” for your choice relative to the black moon
“x” for your choice of house system
“0” to have only the regular planets presented
“1” to use the Fagan/Bradley SVP
“x” for your choice of house presentation in the chart
the last three selections can be left as presented or changed
 FIVE “B“: Go to the Options Menu and click on “global defaults”. The following screen appears. Check the following choices, leaving the other choices unchecked:
“X” Precessed
“X” Node
“X” (optional) Unequal
Click on OK at the botton of the screen.
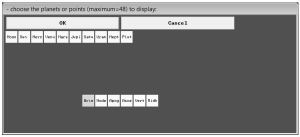
 FIVE “C“: Go to the Options menu choice and click on “selection of planets.” Assure that the planets noted, Moon through Pluto, are selected or “yellowed”. Aso assure that the lower choices Asce and Midh are selected (yellowed). You may choose to include other items as well, but charts are easiest to work wtih when only a limited number of items are viewable. When viewing a bi-wheel chart, these selections will assure that the Asc. and MC positions are noted for the transiting planets (these outer planets will represent the Solar Return or the Progressed Daily Angles charts so an Ascendant or MC position needs to be noted. Click on OK. Note that you can have a number of other solar system bodies presented for selection.
This completes the setup process for using RIYAL to create the MC-Solar Cycle charts as presented and used in this blog-site.

Hi, Dave
The version of Riyal I just downloaded had riyal32.exe already embedded in it and is version 3.5.6, so there was no need to patch it. I had already played around with it before reading this, now I’ll go back and follow instructions. Will let you know by e-mail how it worked out.
LikeLike